Your cellar is invisible to customers, but every pint you pour tells them exactly how you run it.
Industry estimates suggest significant beer wastage across UK pubs, and that figure only covers losses from inefficient line cleaning. Add fobbing, incorrect gas pressure, temperature drift, and poor stock rotation, and the real number is considerably higher.
The good news: most of those losses are preventable. Effective bar cellar management isn’t complicated; it requires the right equipment, a logical physical layout, consistent daily habits, and an understanding of why each task matters.
This guide covers all three areas that the keyword promises and that most competitors leave unaddressed: equipment, organisation, and best practices.
Essential Bar Cellar Equipment, The Complete Buyer’s Guide
Most cellar guides skip past equipment or list two or three items without explaining what to look for. This section gives you a proper category-by-category breakdown of every piece of bar cellar equipment you need, what to consider when buying, and what early failure looks like.
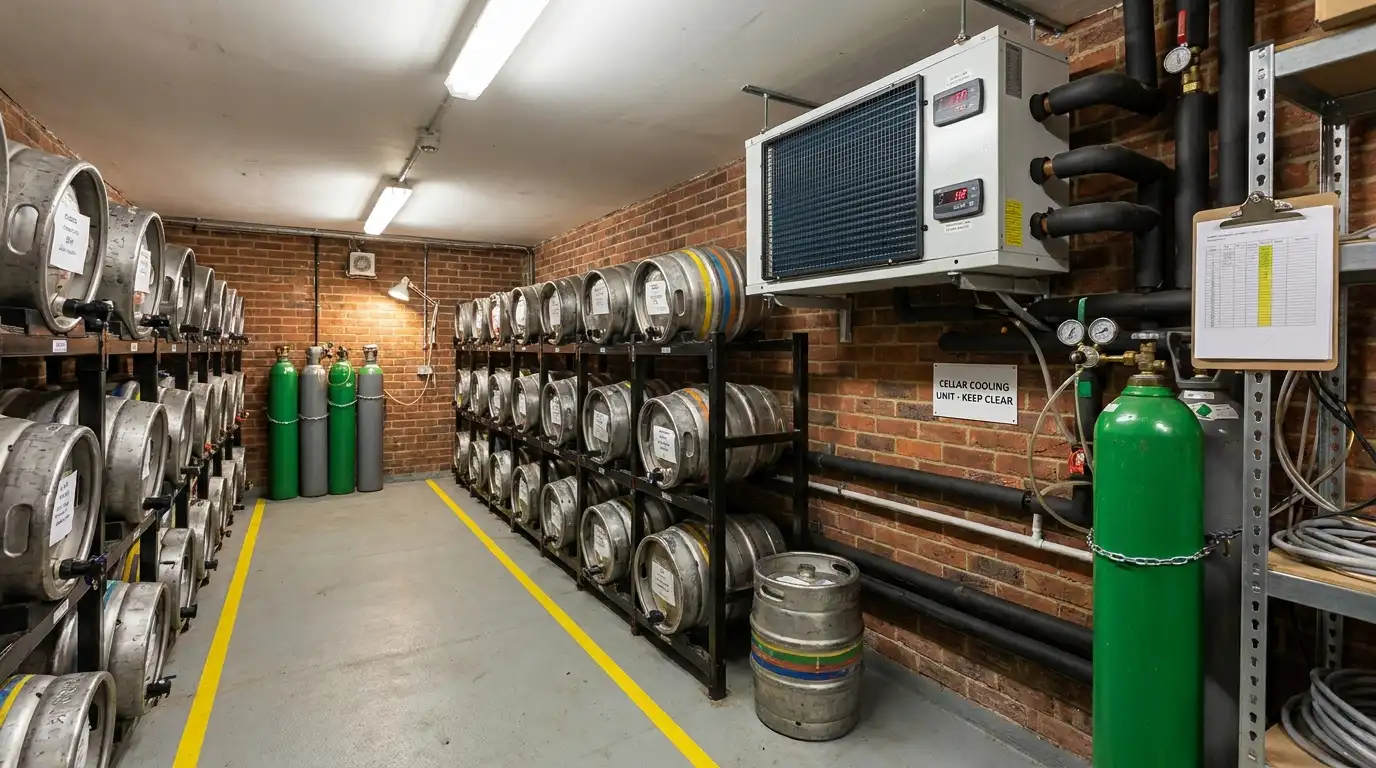
Cellar Cooling Systems

A cellar cooling unit keeps your beer at the correct storage temperature of 11–13°C year-round. Without it, even a single warm day can create foaming problems and flavour deterioration that costs you a full keg.
What to look for when buying:
- ▸ Capacity matched to your cellar volume (undersized units run constantly and fail early)
- ▸ Remote condenser units that vent heat outside the cellar; a condenser inside the cellar adds heat load and can raise running costs significantly
- ▸ Glycol-based systems for larger installations where Python cooling to the bar is required
Signs you need replacing: The unit runs for extended periods without reaching temperature; ice bank is unusually thin or absent; visible corrosion on coils; unusual noise from the compressor.
Operational rule: Never turn the cellar cooler off. It uses more energy to recover from a warm state than to run continuously, and the damage to your beer during warm periods far outweighs any savings.
Gas Systems & Regulators
Gas is what pushes beer from the keg to the tap. Getting the system wrong causes flat beer, over-carbonated beer, or dangerous pressure buildup.
The components you need:
- ▸ Primary regulator, attached to the gas cylinder; controls the working pressure
- ▸ Secondary (line) regulator, positioned near the keg; fine-tunes pressure per product where multiple beers run at different settings
- ▸ Manifolds, distribute gas from one cylinder across multiple keg connections
- ▸ Non-return valves prevent beer from flowing back into the gas line
- ▸ Gas hoses and fittings, replace every 3–5 years; perished hoses are a common undetected leak source
Buying guidance: Choose regulators with clear, accurate pressure gauges. If you run both keg and cask products, ensure your system can isolate gas feeds independently.
Dispense Equipment
This is the hardware that connects your keg to your tap.
| Item | What It Does | When to Replace |
| Keg couplers | Connect the keg to the gas and beer line | When seals perish, or yeast builds up and can’t be removed |
| Hop strainers | Catch sediment before it enters lines | Monthly inspection; replace if the mesh is damaged |
| Hose tails | Connect the beer line to the cask or keg tap | Cracking, perishing, or discolouration |
| Fob detectors | Stop foam from entering the line on keg change | A faulty fob detector is a leading cause of excessive fobbing |
| Spiles (porous & hard) | Control venting in cask ale | Porous spiles are single-use; always have a stock |
Line Cleaning Kit
A proper line cleaning setup is non-negotiable. Your options:
- ▸ Manual cleaning kit, syringe or pump-based system; lowest cost but most labour-intensive; highest risk of incorrect dilution
- ▸ Automated line cleaning machine, consistently doses chemicals at the correct dilution; faster and safer; suited to high-volume or multi-line operations
- ▸ Professional outsourced cleaning service, a trained technician visits on a schedule; recommended if you lack staff time or confidence in the process
Cleaning chemicals: Use a potassium-based line cleaner rather than cheaper caustic alternatives. Potassium-based solutions are more effective against biofilm and less likely to taint the lines if not fully flushed.
PPE & Safety Equipment
CO₂ is odourless and can accumulate in an enclosed cellar to dangerous levels before you notice. The HSE classifies this as a serious risk.
Required PPE and safety items:
- ▸ CO₂ detector/alarm mounted at low level (CO₂ is heavier than air)
- ▸ Rubber gloves and eye protection for line cleaning and chemical handling
- ▸ Non-slip footwear for working in a wet environment
- ▸ Fire extinguisher accessible near the cellar entrance
- ▸ First aid kit
COSHH data sheets for all cleaning chemicals must be stored and accessible to all cellar staff.
Monitoring & Measurement Tools
- ▸ Digital thermometer or continuous temperature logger, a data-logging thermometer that records temperature over time is far more useful than a spot-check thermometer; it shows drift patterns, not just the current reading
- ▸ Pressure gauge tester, checks that your regulators are reading accurately
- ▸ Keg weight/ultrasonic keg gauge, allows you to estimate remaining beer in a keg without disconnecting it
Cellar Organisation: How to Design Your Space for Efficiency

This is the section most guides skip entirely. Physical organisation directly affects operational speed, safety, and stock accuracy, yet no competitor article covers how to actually plan the layout of a bar cellar.
Floor Plan Principles
Start with a simple sketch of your cellar and apply these principles:
- Delivery entry point drives the layout. Place receiving space (empty keg area, pallet space) nearest the cellar drop or delivery door. Live product storage should be deeper in the cellar, away from the entrance.
- Group products by type, then by turn rate. Fast-moving draught lines in a dedicated zone close to your Python connections. Slower products (cask ale on stillage, bottled product) are grouped together but clearly separated.
- Dead stock and empties need a dedicated zone, clearly separated from live stock. Mixing them creates inventory confusion and risks accidentally connecting an empty keg.
- Tools and cleaning equipment belong on a dedicated shelf or rack, never on the floor, never mixed with product.
Product Zoning by Type and Turn Rate
A zoned cellar reduces the time staff spend navigating and almost eliminates picking errors.
Suggested zones:
- ▸ Zone A, Active draught kegs: Connected or next-up kegs. Organised by bar tap number so the correct keg is obvious.
- ▸ Zone B, Keg buffer stock: Settled and ready to connect. Organised by brand/style, newest at the back (FIFO).
- ▸ Zone C, Cask stillage: Fixed stillage or portable saddles. Positioned for easy broaching and venting access.
- ▸ Zone D, Packaged product: Bottles and cans, racked and rotated. Date-labelled on delivery.
- ▸ Zone E, Empties and consumables: Returns area and cleaning supplies. Clearly marked and separated.
Labelling, Signage & Safe Walkways
Minimum safe walkway width: 600mm between stored product and walls. Never stack kegs across walkways, even temporarily.
Labelling best practice:
- ▸ Mark each zone with a wall sign or floor tape in a distinct colour
- ▸ Label every keg bay with the tap number it serves
- ▸ Date-stamp all incoming deliveries with a coloured sticker (week number works well)
- ▸ Keep a whiteboard or laminated daily checklist mounted near the entry point
Floor marking: Use adhesive floor tape (highly visible yellow or white) to mark keg storage bays and pedestrian walkways. Reapply when tape lifts; a faded floor marking is worse than none.
Lighting in the Cellar
Adequate lighting is a safety and operational requirement, not a luxury.
- ▸ Minimum 200 lux at working surface level
- ▸ LED batten lights are preferred, with low heat output (critical in a temperature-controlled space), long lifespan, and bright even in cold environments
- ▸ A battery-backup emergency light near the exit is an inexpensive but important addition
- ▸ Lights should be positioned to illuminate walkways and keg labels without creating glare near the cooling units
Cask Ale vs Keg Beer: Key Management Differences
Many bar teams treat cask and keg as roughly equivalent. They aren’t. The different processes involved mean mistakes in one category don’t apply the same way to the other.
| Cask Ale | Keg Beer | |
| Stillaging | Required, the cask must be horizontal, vented, and still for 24–48 hrs | None, kegs stand upright |
| Venting | Porous spile in first, then hard spile to control secondary fermentation | Not required |
| Gas type | Cask breather (low-pressure CO₂ blanket) if used at all; CAMRA-approved only in some contexts | CO₂ or mixed gas (CO₂/N₂ blend depending on product) |
| Shelf life once broached | 3–5 days maximum | 7–10 days |
| Settling time | 24–48 hours minimum after delivery | 24 hours minimum |
| Serving temperature | 11–13°C (same cellar temperature, no additional chilling) | 11–13°C in the cellar, chilled further through a Python or remote cooler to ~4–8°C at the tap |
Key operational rule for cask: If you pull the porous spile too early or leave it in too long, you’ll either serve an under-conditioned flat pint or a lively one that foams uncontrollably. The timing of the spile change is a skill that every person handling casks must understand.
Gas Management Deep Dive
This is the topic every competitor mentions in passing, and none of them actually explain. Get gas management wrong, and you’ll have flat beer, over-carbonated beer, excessive foaming, or, in the worst case, a dangerous buildup of CO₂ in an enclosed space.
CO₂ vs Mixed Gas vs Cask Breather
CO₂ is used for the majority of keg lagers, ales, and stouts. It maintains carbonation and drives the beer to the tap.
Mixed gas (Beergas), typically 70% nitrogen and 30% CO₂, is used for products like Guinness and other nitro beers. Nitrogen is largely insoluble, which creates the characteristic smooth, creamy texture. Using straight CO₂ on a nitro product will over-carbonate it quickly.
A cask breather is a low-pressure CO₂ system that replaces the air drawn into a cask as beer is dispensed. It extends cask shelf life but is controversial among CAMRA members. Know your venue’s position before installing one.
Setting Correct Pressures by Beer Style
Correct gas pressure depends on three variables: the product’s target carbonation level, the cellar temperature, and the length of the beer line. Most brewery technical teams will set pressure for you on installation, but understanding the principles lets you troubleshoot without waiting for an engineer.
General starting points (at 12°C cellar temperature):
- ▸ Lager: 12–14 psi (0.8–1.0 bar)
- ▸ Ale/bitter: 10–12 psi (0.7–0.8 bar)
- ▸ Stout (mixed gas): 28–34 psi (1.9–2.3 bar)
If your cellar temperature changes, even by 1°C, these pressures may need adjusting. Never adjust keg pressure without understanding why; higher pressure won’t fix a foaming problem caused by a dirty line.
Detecting Leaks & COSHH Compliance
CO₂ leaks are silent and potentially fatal. A cylinder that reads as “on” but delivers no gas pressure is a warning sign. Other indicators:
- ▸ Gas running out faster than expected relative to beer volumes poured
- ▸ Pressure gauge not holding overnight when the system is closed
- ▸ Light-headedness or headache when entering the cellar (evacuate immediately; ventilate before re-entry)
Testing for leaks: Use soapy water on all connections and joints. Bubbles indicate a leak. Never use a naked flame to detect gas leaks.
COSHH compliance: Store cylinders chained upright in a ventilated area. Keep COSHH data sheets for all gases used. Any staff member working with pressurised gas must be trained, and that training must be documented.
Turn off all gas supplies at the end of every trading day. This limits the quantity of gas that can escape in an overnight leak, and prevents over-carbonation of kegged products left pressurised.
Beer Line Cleaning: The Science Behind the Task

Every competitor says “clean lines weekly.” Here’s why it matters, and why the science behind it makes staff take it more seriously.
Beer lines accumulate biofilm: a complex community of yeast, bacteria, and proteins that adheres to the internal surface of the line. Biofilm forms within 24–48 hours of a keg being connected. Within a week, it starts affecting flavour; within two weeks, it can cause visible haze, off-odours, and excessive foaming.
The cleaning process:
- Pull off the beer in the line (or use a line-cleaning system that recovers it)
- Push through fresh water to remove residual beer
- Introduce cleaning chemical at correct dilution, 10–15 minutes contact time minimum
- Flush thoroughly with fresh water until no chemical residue remains (test with pH strips if unsure)
- Pull through with beer to confirm flavour before serving
One chemical that doesn’t fit all: Caustic-based cleaners are cheap but less effective against beer stone (calcium oxalate deposits) and more likely to leave a taint if incompletely flushed. Potassium-based cleaners are more effective, safer to handle, and are the industry standard for serious operations.
Minimum frequency: Weekly, non-negotiable. Busy venues or those rotating many craft lines may benefit from mid-week spot cleans on high-volume taps.
Fobbing & Dispense Troubleshooting Guide

Excess foam (fobbing) is the most common daily problem in any cellar. Here’s a structured diagnostic to find the actual cause rather than guessing.
Step 1: Check Temperature First
A cellar above 13°C almost always causes fobbing regardless of any other variable. Confirm the temperature, not just what the thermostat is set to. A faulty sensor can give a false reading.
If the temperature is within range, proceed to Step 2.
Step 2: Check Gas Pressure
Is the primary regulator set correctly for the product? Is the gauge reading accurate (test with a pressure gauge tester)? Has the cellar temperature changed recently, requiring a pressure adjustment?
If pressure looks correct, proceed to Step 3.
Step 3: Inspect the Beer Line
When did you last clean the lines? Biofilm causes CO₂ to come out of solution early, producing foam before the beer reaches the tap. Clean the lines and re-test.
If the clean doesn’t resolve it, proceed to Step 4.
Step 4: Check the Fob Detector
The fob detector (automatic cut-off) sits between the keg and the line and should stop air/foam from entering the line during keg changes. If the float is stuck, dirty, or misaligned, air gets into the line constantly. Remove, inspect, and clean the fob detector.
Step 5: Check the Keg Coupler
Yeast buildup on the coupler seals causes turbulence as beer enters the line. Remove and clean with a keg coupler brush and sanitiser.
Step 6: Python/Remote Cooler
If the python (the insulated bundle carrying beer lines from cellar to bar) is allowing the beer to warm before it reaches the tap, it will foam at the dispense head even if everything in the cellar is correct. Check Python insulation, remote cooler water levels and temperature setting.
Step 7: Glassware
A glass contaminated with detergent residue or grease destroys the head and causes beer to foam excessively on contact. The lacing test (foam should cling to the inside of the glass after each sip) confirms glass cleanliness.
Quick reference: fobbing causes at a glance
| Cause | Fix |
| Cellar too warm | Check and service the cooling unit |
| Gas pressure too high | Reduce the secondary regulator |
| Dirty beer lines | Full line clean |
| Faulty fob detector | Remove, clean, and replace the float |
| Dirty/perished coupler | Deep-clean or replace coupler |
| Warm python | Check the remote cooler, re-insulate |
| Contaminated glassware | Check the glasswasher, use the correct detergent |
Daily & Weekly Cellar SOP Checklist
Copy and adapt this checklist to your venue. Laminate it and mount it inside the cellar door.
Every Morning Before Service
- ▸ Check and record cellar temperature (target: 11–13°C)
- ▸ Check CO₂/gas detector is powered and functioning
- ▸ Turn on gas supplies and check pressure readings
- ▸ Inspect all keg connections for leaks or drips
- ▸ Check cask ale venting, porous or hard spile as appropriate
- ▸ Rotate any stock approaching its sell-by date to the front
- ▸ Clear any spillages from the previous day
- ▸ Confirm sufficient stock connected for the session ahead
Every Night After Close
- ▸ Turn off all gas supplies at the cylinder
- ▸ Record any wastage (fobbing losses, spillage, line pull-off)
- ▸ Log any equipment issues for follow-up
- ▸ Clear empties to the designated empties zone
- ▸ Ensure the cellar door is locked and secure
Every Week
- ▸ Full beer line clean on all active lines
- ▸ Deep clean keg couplers and fob detectors
- ▸ Check and record keg stock levels; place any orders needed
- ▸ Inspect cooling unit fans and grills, clear any dust
- ▸ Check gas cylinder levels and arrange replacements if needed
- ▸ Clean cellar floor, drains, and walls
Every Month
- ▸ Check all gas hoses and connections for perishing or damage
- ▸ Clean behind and around all cooling equipment
- ▸ Review wastage records and identify any patterns
- ▸ Verify all PPE is present and in good condition
- ▸ Check COSHH data sheets are current and accessible
Wastage Tracking & Benchmarking Your Ullage
Ullage is the industry term for beer that is wasted, through fobbing, line cleaning, pull-off, spillage, or poor pouring technique. UK pubs waste an enormous amount of product this way, and the financial impact is direct: every pint wasted is a pint not sold.
Industry benchmark: A well-run bar should target under 3–5% wastage as a proportion of total beer volume sold. If you’re above this, there’s money to recover.
How to Calculate Your Wastage Percentage
- For each keg, note the total pint capacity (stamped on the keg or in the brewery’s product specification)
- Track the number of pints actually sold from each keg (your EPOS gives you this)
- Wastage % = (Capacity − Pints Sold) ÷ Capacity × 100
A 50-litre keg holds approximately 88 pints. If you sold 80 pints from it, your wastage on that keg was 8 pints, or roughly 9%, too high.
Identifying the Source of Your Waste
Track waste by category separately so you can fix the right thing:
- ▸ Fobbing losses, record points poured down the drain before service settles
- ▸ Line clean pull-off, log how much beer comes out of the line before cleaning chemical; this should reduce as you optimise line length
- ▸ Spillage, bar-side waste from over-pouring or glass breakage
- ▸ Keg returns, unusable beer returned to supplier (damaged, out of date)
Energy-Efficient Cellar Management
With UK energy costs still significantly above pre-2022 levels, cellar energy efficiency is one of the most accessible ways to cut operating costs. This is a topic no competitor covers in any depth.
The cooling cost baseline: Running a typical pub cellar cooling system costs around £1,500 per year in electricity. Minor maintenance or positional changes can reduce that meaningfully.
Keep Remote Coolers Outside the Cellar
Every remote cooler emits heat from its condenser. A remote cooler positioned inside the cellar adds heat load that your cellar cooling unit then has to remove, effectively running two systems against each other. Moving remote coolers to an external wall position has a measurable impact on your cooling costs.
Quantified risk: A single chest freezer inside a beer cellar can increase cellar cooling costs by over £100 per year.
Fan Grill Maintenance
Blocked fan grills on cooling units are one of the most common and easily fixed energy-waste problems in UK cellars. Dust and airborne debris clog the grills and force the motor to work harder.
Blocked grills can increase cooling running costs by up to 40%. A five-minute monthly check with a vacuum or brush pays for itself many times over.
Use Airflow Systems in Winter
When external ambient temperature drops below 10°C, which happens approximately 60% of the year in the UK, a cellar airflow system can bring in cold outside air to maintain cellar temperature. These systems can reduce cooling costs from 50–90p per hour down to approximately 2p per hour during cold periods, saving up to £1,200 per year.
Overcooling is Waste
Setting your cellar thermostat 1°C colder than necessary costs up to 10% more in electricity annually. Set it to 12°C and monitor with a temperature logger to confirm it’s holding correctly, rather than guessing colder is safer.
Digital Cellar Management Tools for 2026

Most competitor guides skip this section entirely, yet it reflects how a growing number of UK operators actually manage their cellars today.
Digital cellar management means connecting your stock data, EPOS sales data, and cellar operations into a single system so you always know exactly what you have, what’s been sold, and where the variance is.
What the Right System Does
An integrated cellar management tool tracks three data streams simultaneously:
- Inbound deliveries, logged against supplier invoices; every keg and cask recorded on arrival
- Outbound usage, pulled directly from your EPOS till, every pint sold automatically reduces your cellar stock count
- Physical stock levels, confirmed via periodic manual counts or barcode entry
When these three streams are live and connected, your stock count is accurate in near-real time. Discrepancies between expected and actual stock flag immediately, rather than at your next manual count.
EPOS Integration, The Critical Link
The most common cellar management failure is running an EPOS and a cellar stock system as two separate, disconnected records. Staff update one but not the other; the cellar spreadsheet is always a day behind; reconciliation takes 90 minutes on Friday afternoon.
When your till and your cellar system are integrated, every pint sold automatically reduces your theoretical stock. If your physical count doesn’t match, the system flags the variance, whether it’s a leak, a staff theft issue, or a data entry error.
Practical tools to consider:
- Brewman, purpose-built cellar stock management with EPOS integration; widely used in UK tied pubs
- SmartPubTools is a simpler, lower-cost option suited to independent operations
- EPOS-native cellar modules, platforms like Epos Now and Lightspeed, offer integrated cellar tracking within their till systems
What Good Looks Like
A well-managed digital cellar setup should allow you to:
- ▸ Complete a stock reconciliation in under 30 minutes
- ▸ Know your live variance percentage at any point during the week
- ▸ Receive an alert when a draught line is approaching the bottom of a keg
- ▸ Track wastage by category automatically, rather than through manual logging
Staff Training & Cellar Responsibility Structure
Even the best-equipped, best-organised cellar underperforms if the team doesn’t know what they’re doing or who’s responsible.
Assign a named cellar manager, one person accountable for maintaining standards, leading the weekly line clean, signing off deliveries, and training new staff. This doesn’t mean they do every task, but they own the standard.
Formal qualifications worth pursuing:
- BIIAB Award in Beer and Cellar Quality (ABCQ), the industry-standard Level 2 qualification, updated for 2024 with Cask Marque input. One-day course covering equipment, cask and keg handling, line cleaning, gas management, and troubleshooting.
- Cask Marque accreditation, a voluntary scheme; an independent assessor visits and scores your cellar and beer quality. The kite mark is visible to CAMRA members and serious beer drinkers.
- Beer Genius (Greene King/Belhaven), free online platform with video training on cellar temperature, line cleaning, gas management, and perfect serve. Excellent for onboarding new staff quickly.
Training documentation: For every cellar task, a written SOP should exist. New staff sign off that they’ve read and understood each procedure. This creates a defensible paper trail and a consistent operational standard regardless of who is working.
The Principles of a Well-Run Cellar
Good cellar management is not complicated, but it does require commitment across three areas that most operators handle separately. Treat them as a system:
- Right equipment, cooling, gas, dispensing, cleaning, and monitoring hardware that is correctly specified, regularly maintained, and replaced before it fails
- Right organisation, a physical layout designed for operational speed and safety; clear zones, labelled bays, correct lighting, and no shortcuts on walkway space
- Right practices, daily and weekly habits that are documented, assigned, and followed consistently; supported by digital tools that give you real-time visibility rather than retrospective guesswork.
A well-run cellar is the foundation of a well-run bar. Every pint your customers enjoy starts here.
👉 For sourcing bar cellar equipment, dispense hardware, and cleaning supplies, see our complete guide to Bar Equipment & Supplies in the UK.
Frequently Asked Questions (FAQ)
What is bar cellar management?
Bar cellar management is the process of controlling how beer and drinks are stored, handled, and served from the cellar. It includes equipment setup, temperature control, gas systems, stock organisation, and routine maintenance. Good cellar management reduces waste, improves drink quality, and keeps service consistent during busy periods.
What temperature should a bar cellar be kept at?
A commercial bar cellar should be maintained between 11°C and 13°C. This temperature range helps preserve beer quality, prevents excessive foaming, and ensures consistent serving conditions. If the cellar temperature rises above this range, it can lead to fobbing, flat beer, and product waste.
How often should beer lines be cleaned in a bar?
Beer lines should be cleaned at least once every week in a commercial bar. Busy venues or those serving multiple craft beers may benefit from mid-week spot cleaning as well. Regular cleaning prevents biofilm buildup, improves taste, reduces waste, and helps maintain hygiene compliance under UK food safety standards.
Author
We Can Source It, Team
We Can Source It is a UK-based supplier of catering and hospitality equipment for bars, pubs, restaurants, and hotels. The company provides practical products and operational supplies that help food and beverage businesses run more efficiently and reduce waste.